ICM He 111-H3 – Day 3

Day 3 had its share of frustration.

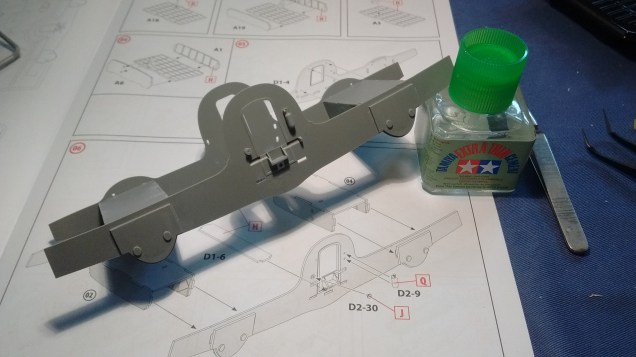
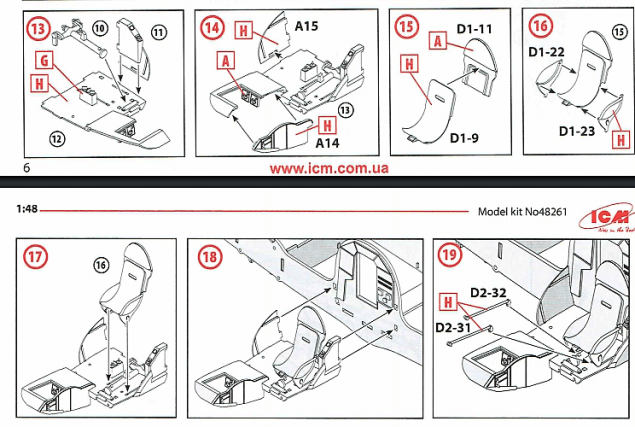
First frustration was with steps 15 and 16 when, contrary to the instructions, I had decided to glued parts D1-22 and D1-23 directly on the floor and then slide the pilot’s seat in between.

Bad idea!

I had also inverted D1-22 and D1-23 and had to pry them off, glue them back on the seat and wait for the glue to set.

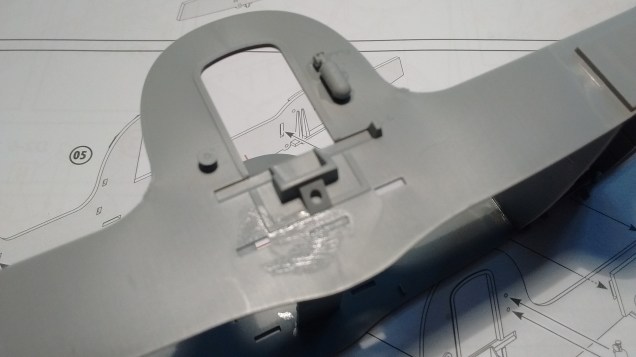
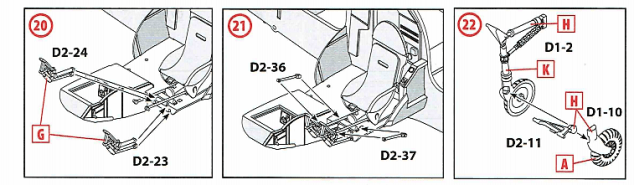
Parts D2-32 and D2-33 came in next and I managed to break part D2-31 in the process of handling the front section of the He 111H-3.

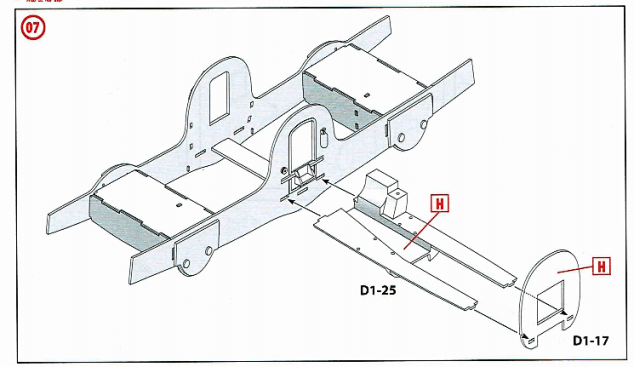
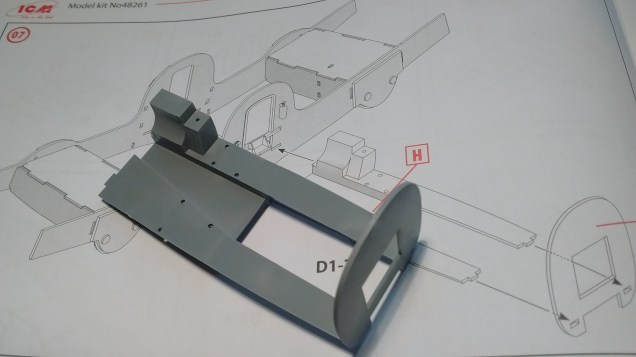
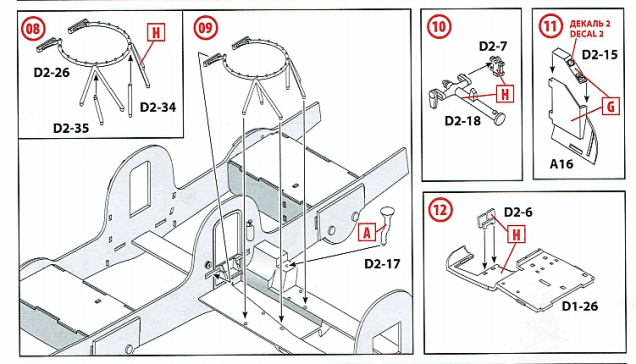
Step 22 and steps 20 to 24 went well.

However steps 25, 26 and 27 made me realize I should have checked more than three times before assembling such tiny pieces which will never be seen by anyone.

Which brings me to this… if you don’t see it, why bother. Is it best to skip steps which only slow down your progress and lead to more frustration?

Feeling frustrated I then checked how the fuselage halves would mate. The plastic is very thin and the locating pins won’t fit in the location holes leaving a gap.

I cut the pins off and dry fitted the fuselage halves to see if it was a good idea.

Great idea!

Next time on Day 4…

Skipping step 29 and moving on to step 30 and beyond…


!

ICM He 111-H3 – Day 2

Day 2, and taking lots of photos? That’s the only way I have found to get going on My Forgotten Hobby III… posting each and every day on how I am progressing with ICM He 111H-3.

With step 7 I had decided to omit parts D2-35 and D2-34 and proceeded with steps 10 and 11.

Parts D2-35 and D2-34 will be inserted later as part D2-26 was posing a problem.

Part D2-26 would not sit in all the location holes as you can see here…

and here…

and here…

I have glued two legs and will glue the others after the glue sets.

Waiting for the glue to set I had continued with step 13 and glued part D1-26 which made more sense than waiting to glue it in step 18.

Confused? Locating where to glue part A16 was confusing enough in the instructions in step 13!


Part A14 was then glued upside down with a little dab of extra thin cement.

Which will leave steps 20, 21 and 22 for another day…

With parts all waiting in a sushi tray…


ICM He 111-H3 – Day 1

Posting on My Forgotten Hobby III how I am progressing from day to day is the only way I have found to get going with building my collection of model kits before I get to be 100…

These are once again the complete instructions downloaded from Scalemates.

1012792-25-instructions

There are 116 steps and more than 300 parts in this kit.

Yesterday morning Steps 1 to 7 have been completed without any problems. I have learned by now to follow the instructions to the letter… A18, C13, A10, A19…

ICM steps 1-5

I have started using Tamiya extra-thin cement I bought a few months ago.

IMG_20201030_104817081

ICM step 6

However I will have to figure out how to use it more carefully…

 IMG_20201030_105045033

IMG_20201030_105104228

ICM step 7

IMG_20201030_105916068

When I reach step 17, I will take Plane Dave’s advice installing the pilot’s seat after the rudder bars and the pedals.

Although maybe a few beefs with the instructions (seriously, they would have you attach the pilot’s seat then build and place the rudder bars and pedals that go under the seat. (?) Or you could improvise and build/attach the rudder controls, then glue the seat down over them… (!))

We’ll see what happens when I reach step 17, but before there are the these steps I will have to tackle with…

ICM steps 8-12

ICM steps 13-19

ICM steps 20-21-22

Heinkel He 111H-3

This is what Plane Dave had to say about ICM He 111H-3 with useful advice. The bold is mine.

I’ll say “wow”, but in a somewhat different sense than the pure joy I got from Tamiya’s latest.

ICM is a Ukrainian company that has staked their claim on German bombers. As is common with Eastern European model companies (ICM and Eduard especially) the complexity is dazzling.

There are many steps and parts involved in building interior detail, bomb bay and engines.

The quality of the engineering is excellent and I have no major complaints about detail or fit.

Although maybe a few beefs with the instructions (seriously, they would have you attach the pilot’s seat then build and place the rudder bars and pedals that go under the seat. (?) Or you could improvise and build/attach the rudder controls, then glue the seat down over them… (!))

COMPLAINT

My biggest complaint is a number of fragile assemblies that really do need to be put in place early (like guns and pilot’s station) then handled very delicately for the next several weeks of work!

Also, speaking as someone who is most interested in air frames, markings and colors I’m not really very interested in the engine and bomb bay details. Fortunately, it’s not a big thing to skip or work around those assemblies. Maybe on a later build I’ll choose to expose some of that, but for now I sure end up with a lot of unused plastic!

I do want to emphasize these are not BIG complaints! This is truly a beautiful kit and I am impressed with ICM as a modern provider of some bigger subjects. It is to their credit that my complaints are really only in comparison to the very best of the best.

DECALS

They are very thin! (modelers will know this is a mixed blessing, they meld into the finish better but are fragile and harder to work with).

They also seem to need a lot of time soaking in water before they are ready to work.

But over all, seriously no big problems. I was greatly pleased and relieved.

CONCLUSION
So in total a very satisfying kit that builds into an excellent model. A few somewhat unpleasant quirks but no big deal. I will happily work with this company again.

https://planedave.net/2020/04/17/heinkel-he-111h-3/

P-51B

This is a follow up on Little Friends I wrote two months ago.

Autumn leaves in my backyard and colder weather leave me no other choice but to postpone using my Badger airbrush outdoors to finish up painting my Airfix 1/48 scale Me 109 and my Monogram North 1/48 scale American Harvard.

I will just have to wait for warmer temperature in May 2020…

In the meantime I will be adding more stories on my blogs as readers will continue to comment on posts I have written. This is how I had learned in September about a distant relative. Lieutenant Thomas Oscar Meteyer, my third cousin twice removed, is seen here sitting in the cockpit of his P-51B probably just after D-Day.

That information came from Peter Randall when I sent him this photo shared by Thomas Oscar Meteyer’s daughter. Peter wanted to know if I knew who were Lt. Thomas Meteyer’s crew. Looking at the photo, his crew chief’s name was written on the plane: S/Sgt J.A. Phillips.

Lt. Thomas Meteyer did not talk that much about the war to his four children. But there is one story his son Michael shared. It was on a newspaper clipping.

Learning about Lieutenant Meteyer I decided to buy two more model kits to add to my collection. First, the model kit of the first plane he flew in combat on February 28th, 1944.

Then the P-51B he flew all his other missions while he was with the 358th Fighter Squadron at Steeple Morden.

Lieutenant Thomas Oscar Meteyer’s service with the U.S. Army Air Corps will eventually be documented on this blog I created for his children and his grandchildren:

https://358thfightersquadron.wordpress.com/ 

I have also created this memorial:

http://www.americanairmuseum.com/person/212339

As a token of appreciation this is what his children sent me.

Which brings me to this…

With all I have as a backlog of model kits I had decided to build Eduard Hawker Tempest Mk V.

Opening the box and inspecting the parts this is what I had found.

The canopy was split in half!

I decided then to contact Eduard’s customer service. We’ll see what happens. While I am waiting for a reply I will start building this long overdue model kit I bought in January 2020.

Next time I will look at reviews of those who have tackled ICM He 111H-3 and then start enjoying my forgotten hobby again.


ICM He 111-H3

There is no turning back now…

There are some nice reviews of this model kit. Here’s a link to one of them.

1/48 ICM 48261 Heinkel He-111 H-3 Kit Review… and it’s a beauty!

These are the complete instructions downloaded from Scalemates.

1012792-25-instructions

These are the first steps… There are 116 steps!


I will of course take a good look at what Plane Dave has to say about ICM He 111H-3 here… and I am sure to find good advice.

https://planedave.net/2020/04/17/heinkel-he-111h-3/